Table of contents
Open Table of contents
- Intro
- Architecture Overview
- Prerequisites
- Steps
- When to Use (and When Not to Use) This Pattern
- Conclusion
Intro
K8S offers multiple ways to expose applications outside the cluster, such as LoadBalancer, Ingress, and NodePort. While Ingress is often the preferred solution, there are situations where running an Ingress controller is not feasible or desirable-especially in lab environments, cost-sensitive setups, or bare-metal / restricted cloud networks.
In this article, I will show you how to setup a lightweight and pragmatic approach to expose Kubernetes NodePort services via subdomains.
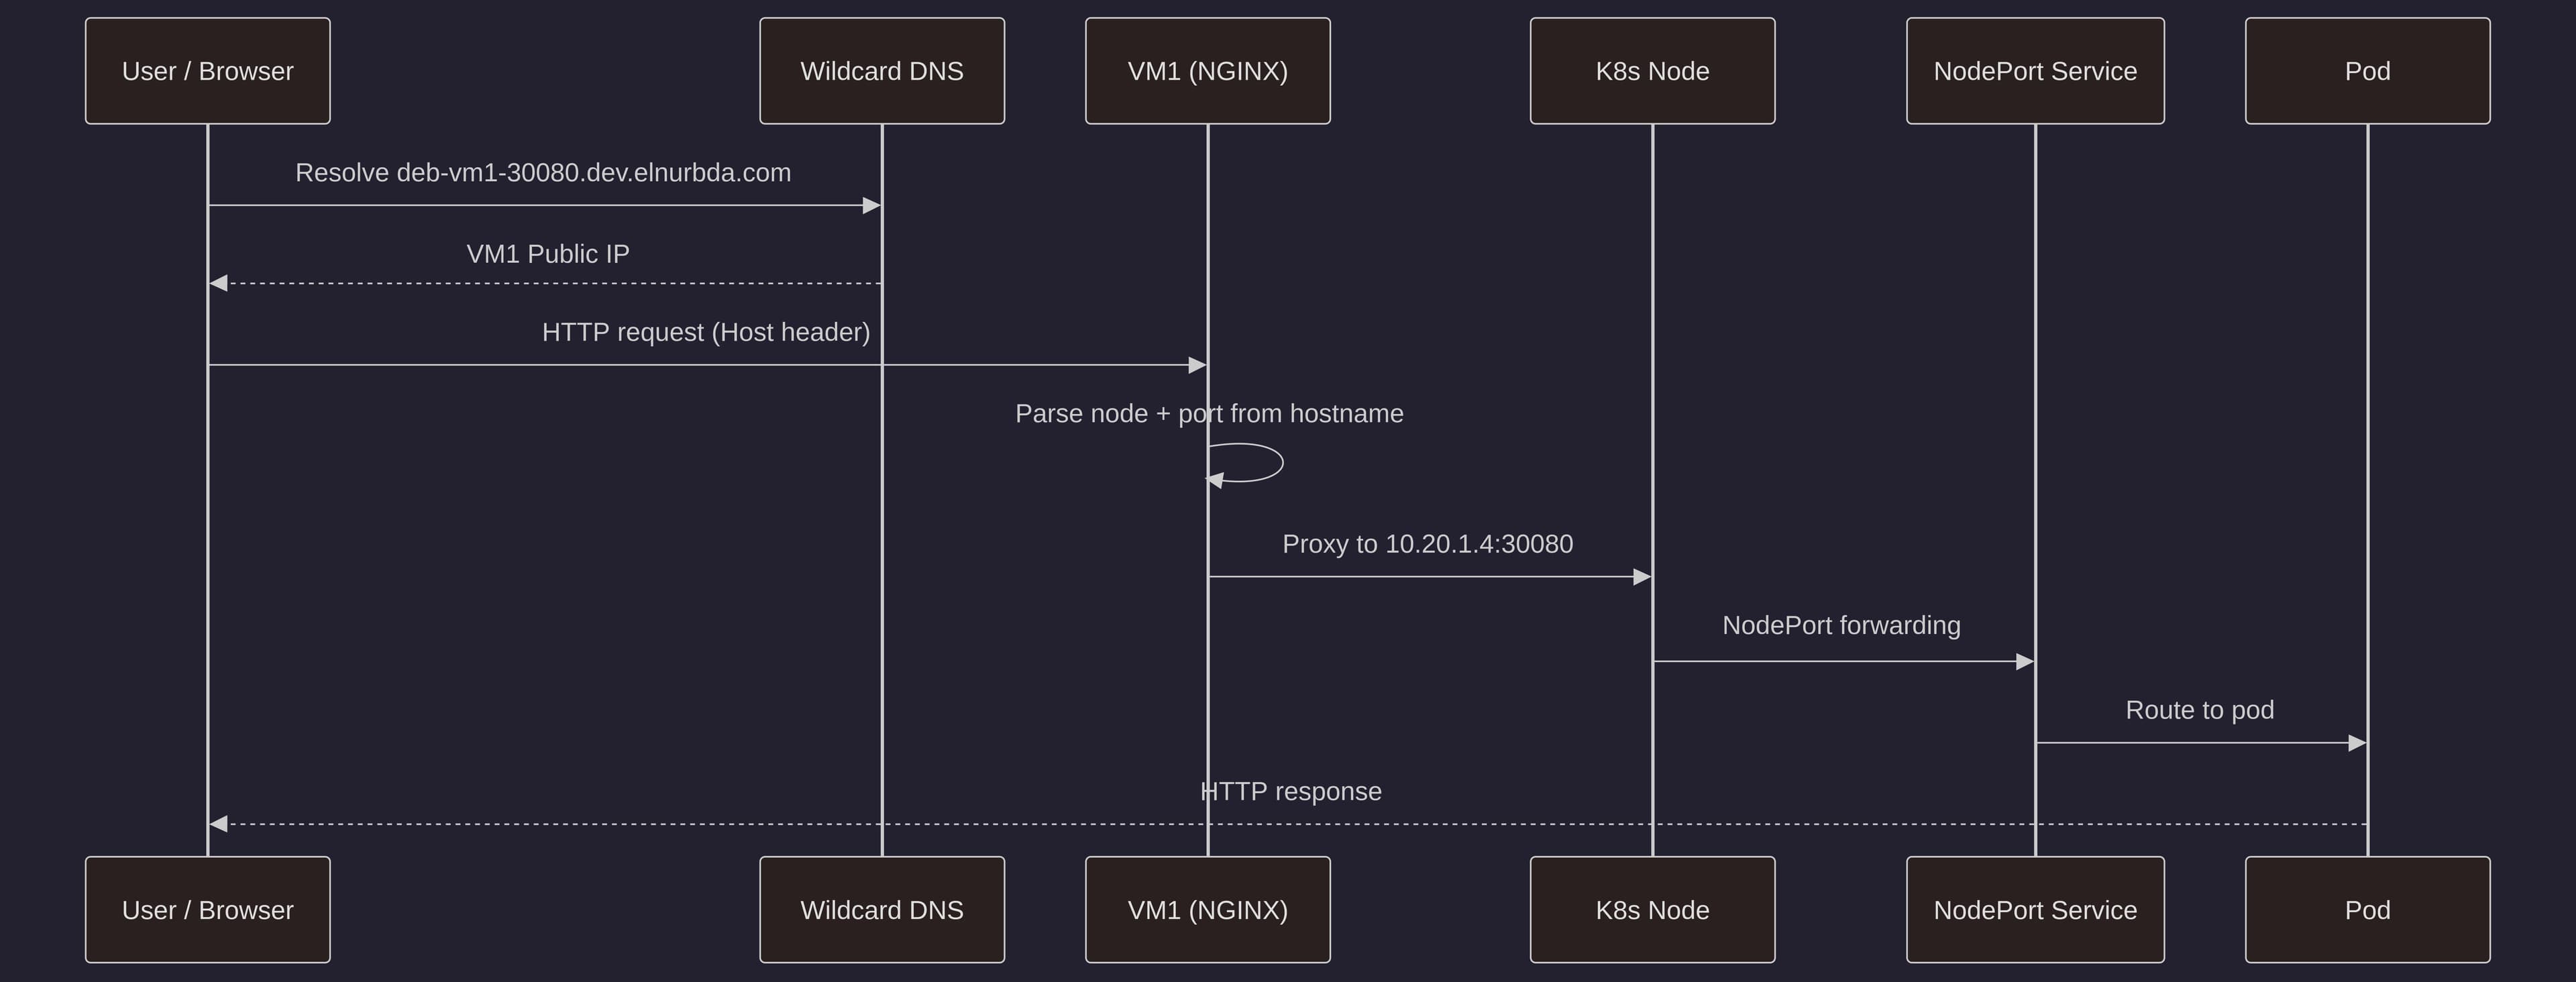
TLDR: This solution uses NGINX as a reverse proxy on the control-plane node (VM1) to route traffic from subdomains to the appropriate NodePort services running on your Kubernetes nodes. Combined with wildcard DNS, this allows you to access your services using friendly URLs like
deb-vm1-30080.dev.elnurbda.cominstead of remembering IP addresses and port numbers.
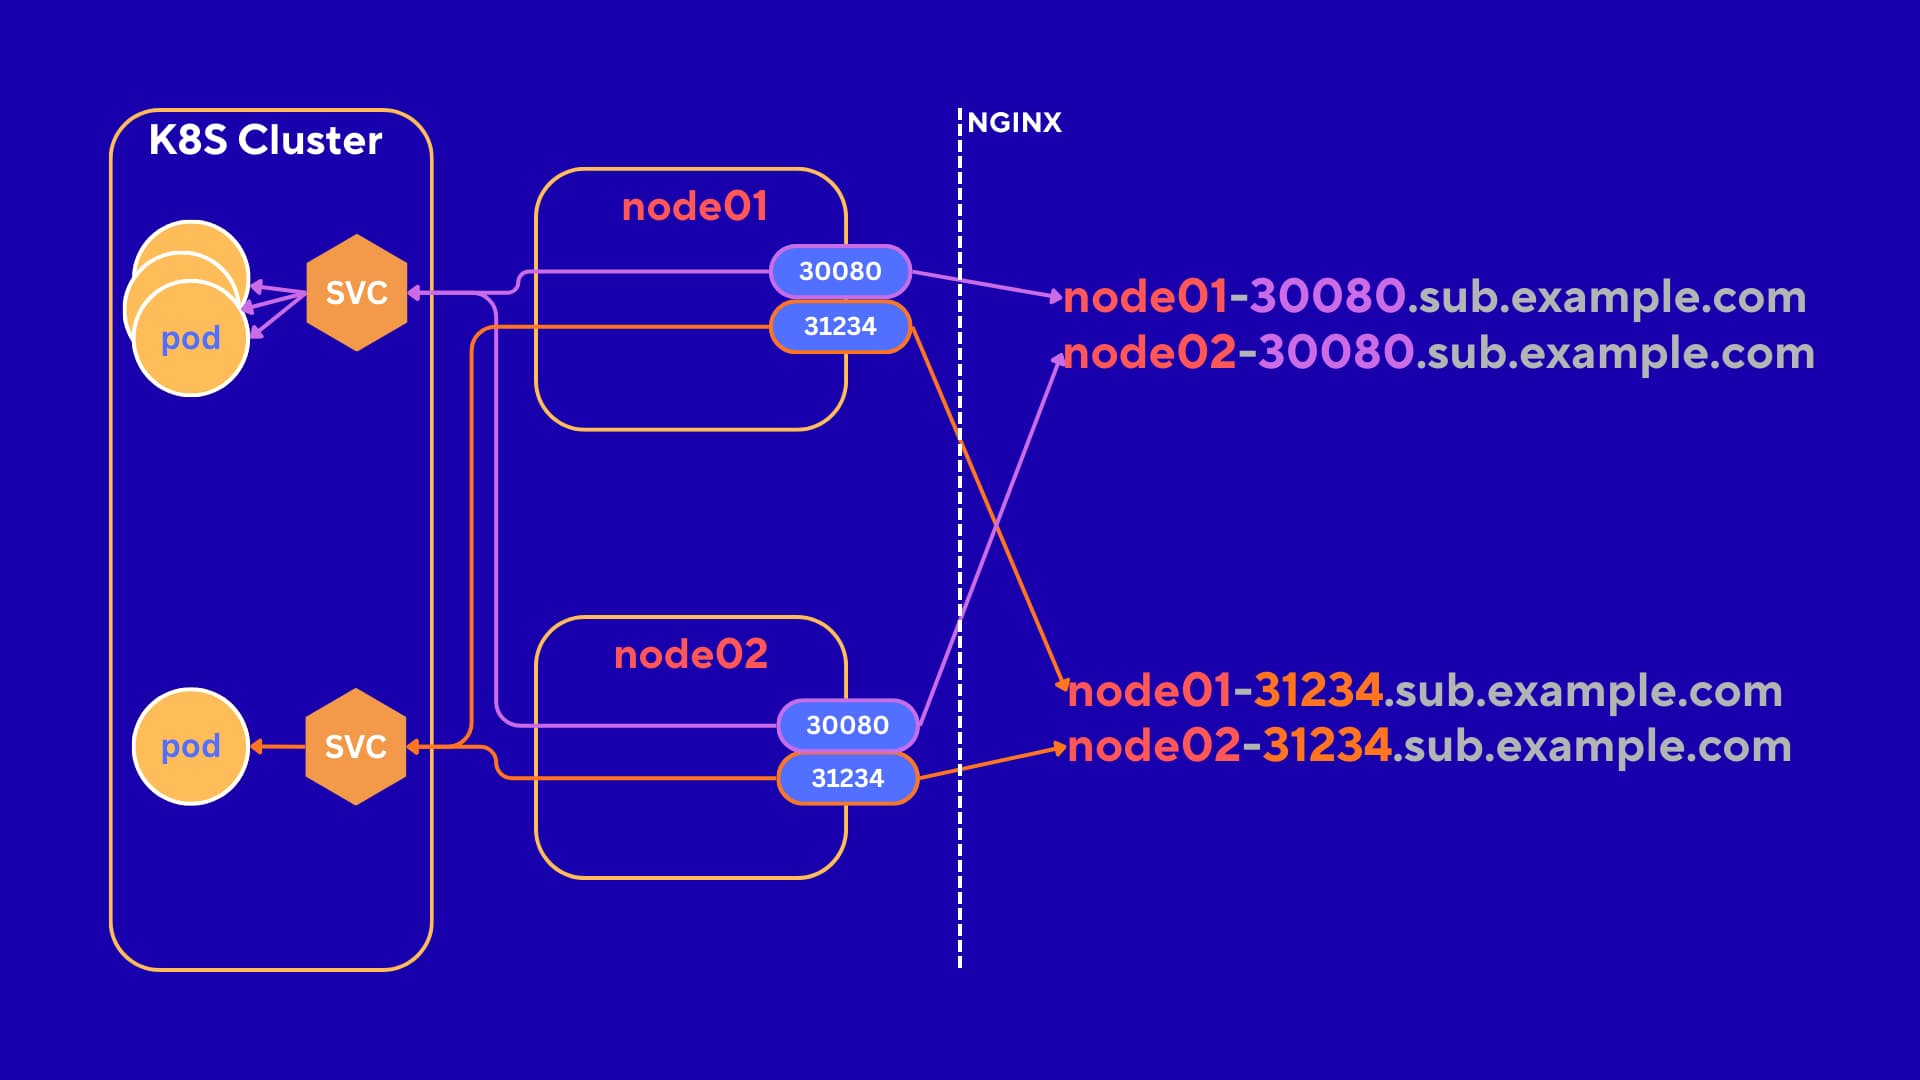
Architecture Overview
The setup:
- Wildcard DNS (
*.dev.elnurbda.com) points to VM1’s public IP - NGINX on VM1 listens on port 80 and routes requests based on the
Hostheader - NGINX extracts the node name and port from the subdomain (e.g.,
deb-vm1-30080→ nodedeb-vm1, port30080) - NGINX proxies the request to the internal IP of the target node at the specified NodePort
- The NodePort service in Kubernetes handles the request and routes it to the appropriate pod
Prerequisites
Before we begin, you’ll need:
- A Kubernetes cluster set up on Azure (or any cloud provider). If you don’t have one yet, check out my k8s-setup-azure repository for an automated setup script. Or use K8S provided by the cloud
- Control-plane node (VM1) with a public IP address
- DNS provider with wildcard record support (Cloudflare, Route53, etc.). For free cloud resources including domains, see my guide on free resources for developers
- SSH access to VM1
- Azure CLI installed and authenticated (for opening NSG ports). If another cloud provider, then figure out this part yourself
:).
The setup assumes you have a 3-node cluster:
- deb-vm1 (control-plane) - IP:
10.20.1.4- Public IP available - deb-vm2 (worker) - IP:
10.20.1.5 - deb-vm3 (worker) - IP:
10.20.1.6
Adjust the IP addresses and hostnames according to your environment.
Steps
Step 1 - Open Port 80 (and optionally 443) on VM1 NSG
First, we need to allow HTTP (and optionally HTTPS) traffic to reach VM1. This is done by creating Network Security Group (NSG) rules in Azure.
rg="SomeRersourceGroup"
nsg="nsg-vm1"

az network nsg rule create \
  -g "$rg" --nsg-name "$nsg" -n "Allow-HTTP" \
  --priority 1010 \
  --direction Inbound --access Allow --protocol Tcp \
  --source-address-prefixes Internet \
  --destination-port-ranges 80

az network nsg rule create \
  -g "$rg" --nsg-name "$nsg" -n "Allow-HTTPS" \
  --priority 1020 \
  --direction Inbound --access Allow --protocol Tcp \
  --source-address-prefixes Internet \
  --destination-port-ranges 443
Note: HTTPS is optional. If you plan to use SSL/TLS certificates later, you’ll need port 443 open. For now, we’ll focus on HTTP.
Step 2 - Configure Wildcard DNS
Next, we need to create a wildcard DNS record that points all subdomains under your domain to VM1’s public IP address.
Get VM1’s Public IP
First, get the public IP of your control-plane node:
az vm show -d -g "$rg" -n deb-vm1 --query publicIps -o tsv
Create Wildcard DNS Record
In your DNS provider (Cloudflare, Route53, etc.), create a wildcard A record:
- Type:
A - Name:
*.dev(or*if you want it at the root level) - Value:
VM1_PUBLIC_IP(the IP you got from the previous command) - TTL:
300(or your preferred value)
For example, if your domain is elnurbda.com and you create *.dev.elnurbda.com, any subdomain like deb-vm1-30080.dev.elnurbda.com will resolve to VM1’s public IP.

Step 3 - Install NGINX on VM1
SSH into VM1 and install NGINX:
sudo apt update
sudo apt install -y nginx
Verify that NGINX is running:
sudo systemctl status nginx
NGINX should be active and listening on port 80.
Step 4 - Configure NGINX to Route Subdomains to NodePort Services
Now comes the interesting part. We’ll configure NGINX to parse the subdomain, extract the node name and port, and route the request accordingly.
Create the Map Configuration
First, create a map file that extracts the backend from the Host header:
sudo tee /etc/nginx/conf.d/nodeport-router-maps.conf >/dev/null <<'NGINX'
# Build backend directly from Host header
map $host $backend {
  default "";
  # deb-vm1-30080.dev.elnurbda.com -> 10.20.1.4:30080
  ~^deb-vm1-(3[0-2][0-9][0-9][0-9])\.dev\.elnurbda\.com$ 10.20.1.4:$1;
  # deb-vm2-30080.dev.elnurbda.com -> 10.20.1.5:30080
  ~^deb-vm2-(3[0-2][0-9][0-9][0-9])\.dev\.elnurbda\.com$ 10.20.1.5:$1;
  # deb-vm3-30080.dev.elnurbda.com -> 10.20.1.6:30080
  ~^deb-vm3-(3[0-2][0-9][0-9][0-9])\.dev\.elnurbda\.com$ 10.20.1.6:$1;
}
NGINX
This configuration uses NGINX’s map directive with regular expressions to:
- Match subdomains like
deb-vm1-30080.dev.elnurbda.com - Extract the port number (30080) using the capture group
$1 - Build the backend address by combining the node’s internal IP with the extracted port
The regex 3[0-2][0-9][0-9][0-9] matches ports in the range 30000-32999, which is the typical NodePort range in Kubernetes. Adjust this if your NodePorts fall outside this range.
Important: Replace elnurbda.com with your actual domain name, and update the internal IPs (10.20.1.4, 10.20.1.5, 10.20.1.6) to match your cluster’s node IPs. FYI, I recommend using AI to generate such configurations.
Create the Server Block
Next, create the server configuration that uses this map:
sudo tee /etc/nginx/sites-available/nodeport-router.conf >/dev/null <<'NGINX'
server {
  listen 80;
  server_name ~\.dev\.elnurbda\.com$;

  location / {
    # If no backend matched → 404
    if ($backend = "") { return 404; }

    proxy_set_header Host $host;
    proxy_set_header X-Forwarded-For $remote_addr;
    proxy_pass http://$backend;
  }
}
NGINX
This server block:
- Listens on port 80
- Matches any subdomain ending with
.dev.elnurbda.com - Returns 404 if no backend was matched (invalid subdomain format)
- Proxies the request to the backend determined by the map
- Preserves the original Host header and adds the client’s IP
Enable the Configuration
Enable the site and test the configuration:
sudo ln -sf /etc/nginx/sites-available/nodeport-router.conf /etc/nginx/sites-enabled/nodeport-router.conf
sudo nginx -t
If the test is successful, reload NGINX:
sudo systemctl reload nginx
Step 5 - Deploy and Test a NodePort Application
Now let’s deploy a test application and verify everything works.
Deploy a Test Application
Deploy a simple web application using NodePort:
kubectl create deploy hello --image=nginxdemos/hello
kubectl expose deploy hello --port 80 --type NodePort
Get the NodePort that was assigned:
kubectl get svc hello
The output will show something like:
NAME    TYPE       CLUSTER-IP     EXTERNAL-IP   PORT(S)        AGE
hello   NodePort   10.96.123.45   <none>        80:30080/TCP   1m
In this example, the NodePort is 30080.
Determine Which Node is Running the Pod
Find out which node is running your pod:
kubectl get pod -l app=hello -o wide
The output will show the node name (e.g., deb-vm1, deb-vm2, or deb-vm3).
Access the Service via Subdomain
Now you can access your service using the subdomain format:
http://<NODE_NAME>-<NODE_PORT>.dev.elnurbda.com
For example, if your pod is running on deb-vm1 and the NodePort is 30080:
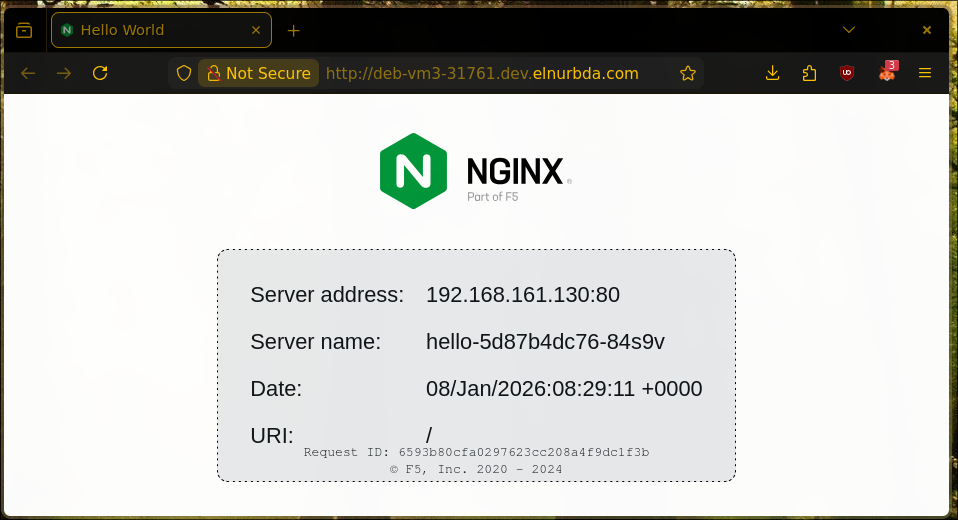
http://deb-vm1-30080.dev.elnurbda.com
Open this URL in your browser, and you should see the nginx hello page!
Quick Script to Get the URL
If you want a quick way to get the URL for any service, you can use this script:
SVC=hello
NS=default
NODE=$(kubectl get pod -l app=$SVC -n $NS -o jsonpath='{.items[0].spec.nodeName}')
PORT=$(kubectl get svc $SVC -n $NS -o jsonpath='{.spec.ports[0].nodePort}')
echo "http://$NODE-$PORT.dev.elnurbda.com"
# http://deb-vm3-31761.dev.elnurbda.com
When to Use (and When Not to Use) This Pattern
When to Use
This approach is ideal for:
- Lab and development environments where you want quick access without setting up an Ingress controller
- Cost-sensitive setups where you want to avoid the overhead of a LoadBalancer service
- Bare-metal Kubernetes clusters without cloud LoadBalancer support
- Learning and experimentation with Kubernetes networking
- Simple setups with a few services that don’t require advanced routing features
When Not to Use
Consider using a proper Ingress controller instead if you need:
- SSL/TLS termination with automatic certificate management (Let’s Encrypt)
- Path-based routing (multiple services on the same domain)
- Advanced features like rate limiting, authentication, or request rewriting
- Production-grade setups with high availability requirements
- Multiple domains with complex routing rules
- WebSocket support with proper connection handling
For production environments, I recommend using an Ingress controller like NGINX Ingress, Traefik, or Istio Gateway, which provide more features and better integration with Kubernetes.
Conclusion
In this article, we’ve set up a lightweight solution to expose Kubernetes NodePort services via subdomains using NGINX as a reverse proxy and wildcard DNS. This approach is perfect for lab environments and simple setups where you want to avoid the complexity of an Ingress controller.
The key benefits of this setup are:
- Simple and lightweight - No additional Kubernetes resources needed
- Easy to understand - Direct mapping from subdomain to NodePort
- Cost-effective - No LoadBalancer costs
- Flexible - Easy to add new services by creating NodePort services
Remember to adjust the domain names, IP addresses, and port ranges according to your environment. If you’re setting up a new cluster, check out my k8s-setup-azure repository for an automated setup script.
Happy Kubernetes networking! :)